
- My conquest failed. Where is my silver?
- I lost the fight – why?
- Nightmode
- Fake attacks
- I lost more than 50% of my Troops even though I had more than 100 units! Why did this happen?
- Support bridge
- Support Bridge
- Color scheme
- Selecting transits
- Update 6.12.0
- My troops were too weak. What happened?
- I won the fight but another player got the castle. What happened?
- Why didn’t my spy return with a report?
- I lost all my castles, can I start again?
- Attack-synchronisation
- Action with the last formation
- Send spy
- Send resources
- Attack castles
- Support castles
- Attack planner/Ask for help
- Buy castle/fortress
- Selection of the unit type
- What do I need to bear in mind if I’d like to conquer 2 fortresses simultaneously?
- Arrival time calculator
- Relocate castle
- Manually delayed transits
- Battle World 4 – Special conditions
- Special abilities
The fights in Lords & Knights are split into battlerounds with each round lasting 10 minutes. As long as there are at least 100 battle units on both sides, attackers and defenders, the casualties will not be more than 50 percent of the actual unit numbers. This does not mean, however, that the battle will definitely end in 1 round as soon as atleast 1 side has less than 100 battle units. If both sides are not strong enough to defeat all enemy troops in that round this battle will continue afterwards.
On battleworlds (depending on the server) 250 or 500 units are needed on each side for the battle to continue.
In fights for fortresses the required units are five times the standard number – 500 on normal worlds, 1250 / 2500 on battleworlds.
My conquest failed. Where is my silver?
Silver is used as payment for your troops. If your conquest fails or you recall your troops all silver you sent with them is lost and can not be refunded.
I lost the fight – why?
It is most likely that all your units have fallen and therefore you have lost the battle.
You should in this case check all the reports related to this battle. You will notice that in the last battle round you will have no information on the the remaining defending units.
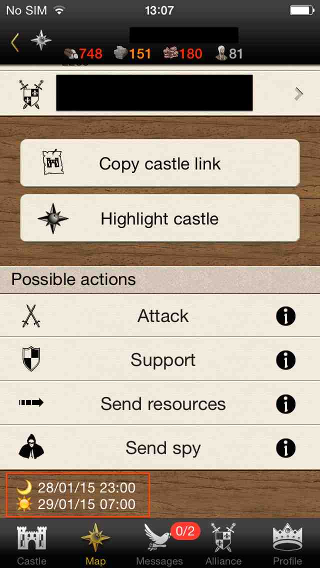
Nightmode
During the nightmode the defender receives a bonus for defensive values. The nightmode starts and ends 1 hour earlier in wintertime than it does in summertime. The time is always related to the servertime. So when your device time is changed you will see the nightmode specific for your new set time. The nightmode can be checked when you open a foreign castle at the map:
Fake attacks
Attacks of any kind are not against our Terms of service, this also implies to so called fake attacks, for instance one or two units coming from great distance.
I lost more than 50% of my Troops even though I had more than 100 units! Why did this happen?
It might happen that a battle ends in one round or the losses are higher than 50%, with more than 100 (500 in Fortresses and 2500 in Cities) units on the attackers side, lets take this case for instance
The attacker sends 500 Crossbowmen to the castle
The defender has 60 Armoured horsemen and fortifications on level 20
The result would be the loss of the 500 Crossbowmen on attackers side as well as a loss of 80 percent of the defenders units. So this rule is bound to the combination of units on both sides.
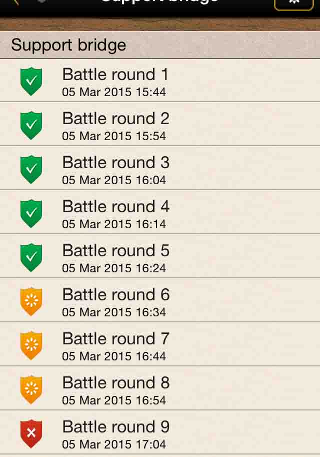
Support bridge
ATTENTION: By using the support button in the support bridge screen you are able to sent troops needed to win the battle round. However troops will not arrive automatically at the right time. You still have to send troops that will arrive before the battle round begins. You should keep this in mind while selecting the castle / fortress from where you are sending your troops.
Support Bridge
The support bridge is a way to organize your defenses, the system calculates the amount of incoming troops and checks if at the time of particular battle round, will there be over 100(castle)/500(fortress) units on defender side. Should this be the case the system assumes that if the attacker side also reaches this minimum requirement, the battle round will be successfully defended and a next one will take place. The user can manually edit rounds if he thinks that he will have recruited troops up until that point etc. Using the orange icon can be used for showing the other support bridge participants that the battle round will be taken care of or not.
This feature will facilitate the creation of support bridges. You can check the overview to see how long the defenders will hold out and whether your support bridge has been properly created. You can see the upcoming battle rounds in a color scheme. Hit the publish button and share the bridge link with other players so they can help you in the creation of the support bridge.
Color scheme
– Battle rounds marked in green signify that you will have enough units stationed in the castle at the beginning of this round to carry the battle into the next round.
– Battle rounds marked in red signify that you will NOT have enough units stationed in the castle at the beginning of this round, so that the enemy will emerge victorious.
– Battle rounds marked in yellow signify that a player with whom you have shared the link has marked that he will send enough units for the start of this battle round to extend the bridge.
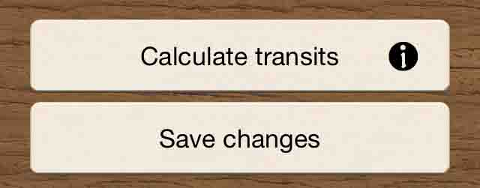
You can change the colors manually by tapping. By hitting the “save changes” button, you can make these changes visible for everyone who has access to the link.
Automatic Calculation
You can automatically calculate whether the support bridge will work with the help of the “calculate transits” button (taking into account all units already stationed here, as well as those in transit). After calculating the transits, you must hit the “save changes” button so that your allies can see the current state of the support bridge.
Selecting transits
You can select which transits will be taken into account with the automatic calculation via the settings button in the top right corner (the selection is via diplomacy status).
Beware: The units that are currently being recruited will not be taken into account.
Update 6.12.0
Support bridge with arrival time calculator
Once the feature „Support bridge with arrival time calculator“ is activated on your world and your app is on version 6.12.0, you can send defenses directly to your friend with the help of the arrival time calculator.
Originally by clicking the „Support“-Button in the support bridge, the „Send Support“ view will be opened. You still have to look for the best habitat and see if from there units can be sent to the selected battle round, which can be very time consuming.
This is now simplified with the combination of the defensive bridge and the arrival time calculator. By clicking on the „Support“-Button in the support bridge, the arrival time calculator will be directly be opened. The time of the battle is automatically selected (-1 minute by default, so that your troops will definitely arrive on time) and the habitat that fits best will be displayed. If you now click on this habitat, the „Send Support“-view will be opened and you can directly send defense.
My troops were too weak. What happened?
If the battle report says that your troops were too weak to conquer, could be because some of the following reasons:
– You have not sent enough silver for conquest.
– Another player has sent more silver ratio than you.
– You lost the battle and all your troops died.
* Please consider that transport units have no offensive values and are therefore not offensive troops ( all castles have at least level 1 fortifications protecting them from being raid by transport units)
I won the fight but another player got the castle. What happened?
Should several players be trying to simultaneously conquer a castle, the player with the highest silver ratio (silver sent / silver needed) will successfully conquer the habitat.
For instance:
Player A will need a 1.000 silver and sends an additional 1.000 silver (so 2.000 in total) which makes a ratio of 2 or 200%.
Player B only sends the required 5.000 silver which he needs, possessing 5 castles.
In this case player A will conquer the castle.
Player B would require 10.001 silver to conquer the castle in order to beat the silver ratio of player A in this example.
If both players send the same ratio of silver, the player who conquers the castle is decided at random.
Why didn’t my spy return with a report?
Should you not be receiving any spy reports then they are maybe disabled.
Visit the report section and tap on the gear symbol at the top right. On the following screen you’ll be able to activate and deactivate specific reports.
Unfortunately it is not possible to reconstruct subsequently.
I lost all my castles, can I start again?
Should you have lost all your castles on a world you can for sure start over again.
You will start of with a new castle on the map.
Attack-synchronisation
Attack-synchronisation is used to coordinate both attack and support movements originating from several castles. The arrival of an existing troop movement serves as a basis for further attacks, so that all attacks arrive at the exact same second. It is however only possible to slow down troop movements, therefore you can only select units which are able to reach the destination on time.
Starting the Synchronisation
The button for synchronisation is shown in the transit column of the active castle under the following conditions. If the castle is close enough to the target, so that all its units can get there in the remaining time, then the button is shown without any restrictions. If the castle is close enough to the target, so that fast units can get there on time, but slower ones can’t, then the button is shown, but the troop selection phase will be restricted. Should the castle be too far away from the target, the button will not be shown and no attack-synchronisation is possible.
Troop Selection
The attack-synchronisation is made in the following screen. The time arrival of the existing troop movement is shown beneath the target. Now you can choose the troops you want to send. If this is for an attack, you may choose to select silver. If the unit is not able to reach the preexisting troop movement, then it will be faded out and you can not synchronise your attack with it. It is possible to see under the transport time, how long the delay is with which the selected troops arrive to their destination.
Starting the Attack-synchronisation
A new transit of the corresponding type is created once the button for the attack-synchronisation is pressed. Its time of arrival equals that of the previous selected transit.
Action with the last formation
Players have the opportunity to execute the last action they used (attack, support, send resources and send spy) with the same units and resources immediately.
The “last formation” function can only be used if an action has already been used and the same amount of units and resources are available in the currently selected castle. The “last formation” function will not be shown otherwise.
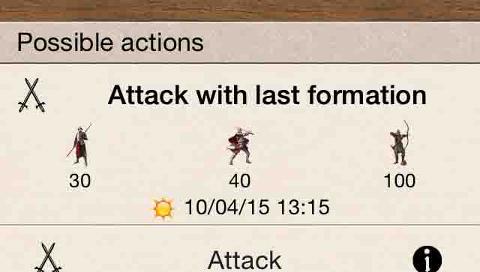
The formation will only take the unit types (as well as their amount) and the selection of resources (as well as their amount) into account that have participated in the last action. Silver for attacks is also taken into consideration.
Send spy
The spy is paid in copper. For the espionage to be successful, the client must pay his spy more copper than the amount available in the target castle. If he pays enough, the copper will be used up, but if he does not pay enough, the spy will be arrested and the copper will still be lost.
Spy Report
If the espionage has been successful, the spy will deliver a detailed report about the buildings (incl. upgrade levels), defensive units (including those from other castles) and any resources stored there. However, the spy cannot see any troops that are outside the castle at the time of his espionage mission (e.g. on missions).
Defense against Spies
To fend off an espionage attack, there must be at least as much copper available in the castle as the client paid the spy. In this case, the amount of copper to arrest the spy will be used up. If there is not enough copper in the castle, the espionage is considered successful, and the castle will be unaware that it has been spied on.
Send resources
You can use this function to send ressources (wood, stone, ore) to other castles. If you select your own castle, you can even send copper and silver. To do this, you must first select the units to transport the resources. The transport time will be based on the slowest unit. The load capacity will increase with each additional unit. Ox carts and handcarts are ideal methods of transport. You can then select the resources.
You cannot recall the transport once you have clicked “Send resources”. The troops will automatically return to their castle. The transport cannot be called back or cancelled.
Players with several castles can use the castle selection option in the bar above to select a different castle from which to send resources, and therefore immediately send more transport units to a target in a short period of time.
Attack castles
Free castles have no lord, and are a good source of resources for players new to the game. Their defence consists of level 1 fortifications only, so it’s an easy game for attackers!
Attacking player castles
Enemy castles can be attacked by one or several players. If the attacker wins the battle, he acquires the resources of the enemy castle. To capture a castle, he must pay his troops in silver, which can be exchanged for resources in the keep.
The combat system is described in more detail below:
Attacking
Attacks take place using selected troops. The speed of the chosen troops is determined by the slowest unit. The defender will know he is being attacked from reports and also in the troop overview of the relevant castle. Initially he cannot see the number and formation of the troops.
Arrival of troops
Once the troops have arrived, the attacking troops wait in front of the besieged castle. The defender learns of the arrival of the troops at the castle, who is attacking and with which troops in the troop overview of that castle.
Battles
The first battle commences 10 minutes after the first enemy troops have reached a castle. During this time more attackers may arrive at the castle and join in the battle. An attacker may also withdraw his troops again.
Support forces may also arrive to join in the battle to defend the castle during the 10-minute period. The defender could also send for troops he has stationed in other castles, initiate attacks or recruit troops.
Attackers and defenders therefore have a number of tactical manoeuvres available that could decide the outcome of the battle. The player who can keep a cool head in a combat situation and selects the right units and acts strategically has a good chance of gaining victory.
If more than 100 units are taking part in the battle on both sides, they will be deployed in rounds. As not all the soldiers will fall in a round, players can introduce tactics after each round such as retreat, reinforcement or extra deployment of troops to win the battle. The next round of combat will start 10 minutes later.
Calculating troop losses
The troop losses are calculated using the ratio of defensive and attack values of artillery, cavalry and infantry.
Capturing a castle
If all the defender‘s units are defeated, the attacker can capture the castle. To do this, he must pay his troops enough silver. The amount of silver required depends on the number of castles the attacker already owns: 1,000 silver are required per castle. These precious coins can come from different castles belonging to the attacker.
If several players attack a castle and they pay their troops enough silver, the player who has paid the highest ratio of silver paid to silver required takes the castle. If a player pays 2,000 silver and needs 1,000 to capture the castle, he has a ratio of 2. Another player already has 2 castles, so he needs 2,000 silver to capture the castle. If this player sends 3,000 silver, he has the ratio 1.5; in this case the player with the higher ratio will claim the castle.
If several players have the same ratio, the winning player will be chosen at random.
Support castles
You must use the slider to select troops to go and help defend another castle. The traveltime indicated will always be based on the speed of the slowest unit.The troops will be deployed when you press the “Support” button.
External troops will be listed separately in the troop overview of a castle and, once they have arrived, they can be called back at any time. It may be very useful to send troops to other castles, for example after capturing a castle or in the event of an imminent attack.
Attack planner/Ask for help
With the “plan attack” and “ask for help” buttons, a player has the option of sharing both his own attacks as well as the his enemies’ attacks with his alliance. This will facilitate the coordination of alliance members, so that they can provide help for this player both faster and more efficiently. Shared attacks are shown to all members in the alliance profile in the “war efforts” tab.
War efforts
The “war efforts” category is divided in two sub-categories: Attack and defense. All the attacks from members of the alliance are listed under the “attack” category, all attacks from ennemies are listed under the “defense” category. The next incoming troop movement or the beginning of the next combat round is shown at the top of this list.
Buy castle/fortress
The function „Buy castle/fortress“ allows you to purchase free castle or free fortresses for gold coins. The purchased castle/fortress is immediately taken over by the player and any conquering transits are omitted.The costs for buying a free castle/fortress are shown by activating the button. Once a habitat has been bought, the function will only be usable on another castle/fortress after a timer has run out.
Castle and fortress purchasing functions work independently from each other and they both have their own cooldown and timer. Therefore the costs for a free castle/fortress are different.
Troops in the habitat
The chosen castle/fortress can‘t be bought, if there are attacking or conquering troops in it. The habitat can be purchased, after all battles have concluded, providing the castle/fortress hasn‘t been conquered.
Transits
All transits on the way to the chosen castle/fortress will be sent back. Buying the castle/fortress remains possible in this case.
Selection of the unit type
With the help of this button, all unit types can be either selected or deselected. Furthermore, each type of unit can be selected by taping on its cell. Another tap on the cell will deselect that unit.
All units of the selected type will be sent back or called back. All selected units will be rolled together into one transit per castle. All units that have not been selected will remain in the castle that they are currently being stationed in.
What do I need to bear in mind if I’d like to conquer 2 fortresses simultaneously?
As fortresses are created out of 5 castles, you will also need five times the regular amount of silver in order to conquer another fortress. That also means that if you should conquer a fortress and meanwhile launch an silver carrying attack on a second fortress, you will need 25,000 silver more on the second fortress than you have needed for the first one. In general you can use the following values in order to get the right numbers: A new fortress will set the required silver for the next castle to 5000 and for the next fortress to 25,000.
For Instance:
- Should you need 381,000 silver for another castle to be taken over, you will need 1,905,000 for a fortress
- Should you be conquering a castle then the same costs would be raised to 382,000 silver and 1,910,000 respectively
- Should you instead be conquering a fortress, then the required silver amount for the next fortress will be at 1,930,000 silver
Basically, the following values can be used as a guideline:
A new castle means that the next castle will cost 1,000 silver, the next fortress will cost 5,000 silver, and the next city will cost 25,000 silver more.
A new fortress implies that the next castle will cost 5,000 silver, the next fortress will cost 25,000 silver, and the next city will cost 125,000 silver more.
A new city means that the next castle will cost 25,000 silver, the next fortress will cost 125,000 silver, and the next city will cost 625,000 silver more.
Arrival time calculator
Arrival time calculator
With the help of the arrival time calculator, you can display all of your own castles that will be able to reach a castle selected from the map at a given arrival time or within a given transport duration. Choose both the unit type and the arrival time to filter for the best castles. You can find the arrival time calculator among the possible actions of the map view of a castle.
Choosing the arrival time / transport duration
You can choose the arrival time or transport duration by taping the appropriate cell. The maximum arrival time can be three days in the future, while the maximum transport duration cannot exceed 72 hours.
Changing settings
Within the settings, you can choose with which type of action you wish to interact with the castle selected on the map and which unit type you wish to take into account for the calculation.
Selecting the action
Selecting an action in the settings allows you to directly perform the chosen action after filtering the castles. This allows you to send out attacking units, supporting units or resources very quickly.
Unit selection
The unit selection is meant to narrow down the castles shown. The selected unit type must be available in the castle so that you can perform the selected action. This allows you to easily select different unit types for different actions.
Castle listing
All of your own castles will be listed. The following sorting criteria will make the list easier to read:
- Castles will be listed from the earliest to the latest arrival time (or the shortest to the longest transport duration), under the assumption that the chosen troop movement starts this very moment.
- The castle that can most closely match the set time will be shown in green.
- Castles that have their time shown in red do not have any of the chosen units. The displayed time is the arrival time or transport duration that they would have, provided that they had the chosen unit.
- Castles that have been faded out are too far away and cannot reach the selected castle.
Executing the action
All you have to do to execute the selected action, is tap the appropriate castle in the list. This tap will open the regular action screen. The castle selected from the list has already been set as the starting castle so that you can start the transit immediately.
By hitting the back button, you can simply select the next castle in the list to send further transits.
Relocate castle
The “relocate castle” feature allows a player to exchange the position of his own castle with that of any free castle on the map. This allows both alliances and friends to gather in certain regions of the map, which will then facilitate working together.
Using the feature
The feature can now be used repeatedly and is just limited by a cool-down of 3 days after each activation. Furthermore, the use of this feature will cost a small amount of gold coins.
In order to switch the position of one of your own castles with the position of a free castle, you have to select the chosen free castle on the map. You will find the “exchange castle position” button beneath the “highlight castle” button.
Units stationed in the relocated castle
Any foreign supporting troops stationed in the castle that is being relocated will be taken to the new position and will thus remain with the castle.
Attacking units
The position cannot be swapped if there are attacking units present in either the free castle or player castle. It can also not be swapped if there are attacking transits on the way to the player’s castle or going out from it. The position can be changed as soon as the battle has stopped, provided that the free castle has not been conquered.
Transits
- All transits that are on the way to the free castle will be turned around once the exchange has happened. This means that it is possible to exchange the positions while transits are on their way.
- All transits that are on the way to the player’s castle will be teleported back.
- All outgoing transits will be aborted and teleported back to the player’s castle
Manually delayed transits
This feature allows the players to delay the arrival of their transits manually, in order to make them arrive at a specific time. This allows players to plan their troop movements ahead of time while reducing the time they have to wait to send their transits.
Using the feature
In order to open the time selection, the player needs to tap on the arrival time cell. After having changed the arrival time, the player needs to tap on the arrival time cell once again in order to collapse the time selection and save their current selection. Any transit can be delayed by up to at least 1 minute. The maximum amount of time a player can delay their transits is equal to 5% of the original transport time of the selected units. the maximum time a player can delay is 2 hours.
Understanding time delay
The time delay cell informs the player about the amount of time the transit will be delayed in order to meet the chosen arrival time. The delay will not affect duration of the returning transit. In other words, the returning transit will not be delayed and will return in a shorter time, than the time it took to reach its destination.
Resetting time delay
- iOS: In order to reset the time delay to the original arrival time, the player needs to swipe on the “time delay cell” and tap the reset button.
- Android: In order to reset the time delay to the original arrival time, the player needs to tap the reset button in the time selection popup.
Battle World 4 – Special conditions
The battle worlds are clearly focused on epic battles and are therefore particularly interesting for those among you looking for a challenge with going straight into the action.
To make this possible, your starting castle on these worlds will begin with
- Level 6 resource stocks with a capacity of 575 units per resource
- A level 4 farm
- 500 units of wood, stone and ore
- 45 units in total as well as 5 oxcarts for farming.
Additionally the following conditions apply:
- The population limit per castle is of 9,999 units (with a fully developed farm).
- Free castles develop themselves up to 80 points on their own.
- At least 250 units will be necessary to make a battle go for more than one round.
- There is no more night mode!
- Alliances are limited to 50 members. Only the best team players will prevail!
- Beginner protection ends after 5 days and you only have 21 days of vacation protection at your disposal per year.
- No pushcarts
Special abilities
Special skills are additional characteristics of units that can improve your units or weaken enemy units.
DESTRUCTION
General information:
- The defense values of all defending units will be weakened as soon as the attacker uses a defined amount of units with the special ability „destruction“.
- The more units with the special ability „destruction“ are taking part at the battle, the greater the effect.
- The system calculates the effect of the ability after checking how many units with the special ability „destruction“ the attacker is using in each battle round.
- The effectiveness of the special ability is independent of the unit type. It does not matter if you have 100 infantry or 100 cavalry units with this skill per battle round. The effect of the special ability is the same.
- The effectiveness is independent from the owner of the units. It does not matter if attacker A or attacker B brings the siege weapons; all attackers take advantage of the siege weapons that take part in the battle.
- The required units with special ability „destruction“ are independent of the habitat type. If 100 units with special ability will weaken the defenders by 5% per battle round in a castle, the same amount of units will also achieve 5% weakening per battle round in a fortress or city. This fact makes them especially valuable for fighting heavily defended fortresses and cities.
Effect:
The following list can be understood in the following way:
“X – Y units with special ability per battle round available = Z% weakening of defense values”
Values:
- 0 – 500 = 0%
- 501 – 2000 = 5%
- 2001 – 5000 = 10%
- 5001 – 10000 = 20%
- 10000 – 20001 = 30%
- > 20001= 40%
Example for the night mode (fictional values):
Without siege weapons:
- Defense – base value: 100.000
- Defense – with bonuses (research, wall etc.): 200.000
- Defense – with bonuses and night mode: 300.000
With siege weapons: (40%-decrease):
- Defense – base value: 60.000
- Defense – with bonuses (research, wall etc.): 120.000
- Defense – with bonuses and night mode: 180.000